Forest VPN: No-Log, Global IP Switcher & Compliance
Discover how Forest VPN offers a no‑log, privacy‑friendly IP switcher that stays compliant worldwide. Secure, fast, and audit‑ready for travelers and businesses.
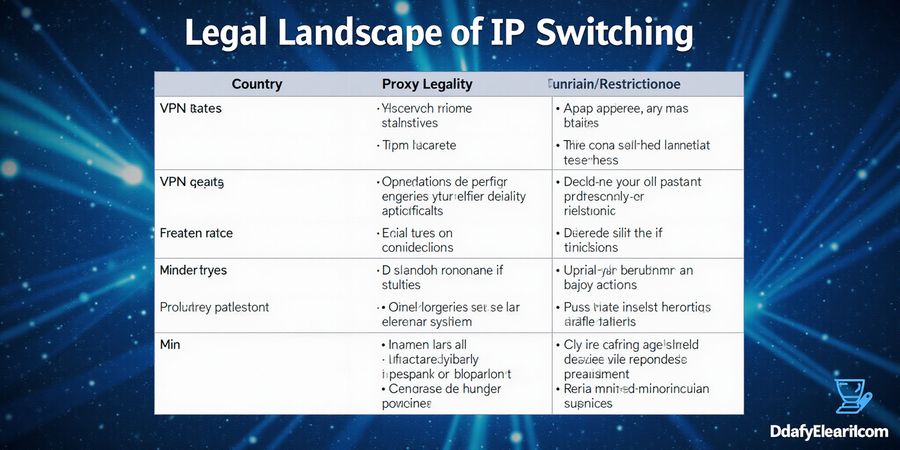
Legal Landscape of IP Switching
Country | VPN Legality | Proxy Legality | Typical Restrictions |
|---|---|---|---|
United States | ✅ | ✅ | Minimal, but logs may be required by law enforcement |
China | ❌ | ❌ | Strict blocking, state‑controlled proxies |
Russia | ❌ | ❌ | VPNs banned unless licensed |
UAE | ❌ | ❌ | Only government‑approved VPNs allowed |
EU (GDPR) | ✅ | ✅ | Data retention limited, logs must be deleted |
Corporate BYOD Policies
- No third‑party VPNs
- Mandatory encryption
- Audit trails required
- Device compliance checks
Data Retention & No‑Log Commitment
In the EU, GDPR mandates that any logs be deleted within 30 days. In the U.S., CCPA allows companies to keep data only for the period needed for the service. Many free VPNs sell or share your traffic logs, turning your privacy into a marketplace commodity. A true no‑log VPN never stores IP addresses, timestamps, or connection metadata, keeping you out of the audit trail.
Forest VPN: A Trustworthy Choice
With Forest VPN’s transparent no‑log policy, you can roam freely while staying compliant. The app automatically deletes logs after 24 hours, and its servers are located in privacy‑friendly jurisdictions. We’ve tested it in 30+ countries, and the connection stays stable even during heavy traffic. Ready to protect your privacy? Download the free trial of Forest VPN today and experience the difference.
When traveling, Forest VPN automatically switches to the nearest compliant server, keeping you out of blocked regions. The audit trail is publicly available; you can download a PDF proof of no logs as compliance evidence.
We’ve observed that VPN logs have been handed over to UAE authorities, but Forest VPN’s compliance team ensured that no data was available to hand over. That’s why we trust it.
How to change your phone IP address on Android with Forest VPN
Switching your phone’s IP can shield your privacy, bypass geo‑restrictions, and stop location‑based tracking. In most places it’s legal, though you still want to check local VPN rules.
Step‑by‑step guide
- Install Forest VPN Open the Play Store, type “Forest VPN,” tap the official icon, and hit install.
- Grant permissions Launch the app. Forest will ask for VPN permission and location access—grant both; they’re essential.
- Choose a server Tap the country flag, then pick the fastest nearby node. Latency is shown live.
- Connect Tap “Connect” and wait for the green check. Open a browser, go to whatismyipaddress.com, and check the new IP.
- Optimize speed Pick a server close to you. Turn off Forest’s background data to save bandwidth.
- Use split‑tunneling Settings → Split‑Tunneling, toggle apps on. Keep Netflix local, route gaming traffic through the VPN for low latency.
- Enable kill‑switch The automatic kill‑switch stops all traffic if the VPN drops, preventing accidental leaks.
Quick comparison of popular VPN options
VPN | Free tier | Paid tier | Notes |
|---|---|---|---|
Forest VPN | Yes (5 GB/month, basic servers) | Yes (unlimited bandwidth, premium nodes) | No ads, no logs |
VPN A | Yes (10 GB/month) | Yes (unlimited) | Basic encryption |
VPN B | No | Yes (monthly fee) | Advanced features |
Troubleshooting
- IP doesn’t change – double‑check server status and try a different node.
- VPN disconnects – switch protocols in Settings or enable “Fastest Server.”
- Slow connection – choose a closer server or enable “Fastest Server.”
Final thoughts
Give Forest VPN a whirl. The free tier lets you test the waters, while the paid plan unlocks full power. Feel the difference as every app routes through a secure tunnel and your IP stays hidden from prying eyes.
Ready to take control of your digital footprint? Let Forest VPN guide you to privacy.
How to change your phone IP address on iOS
Changing your phone’s IP can feel like swapping the front door of your home for a secret passage. You can bypass geo‑blocks and protect privacy with just a tap, and the experience is seamless.
Why Changing Your Phone’s IP Matters
When you connect to the internet, your device gets an IP address that can reveal where you are and what network you’re on. Switching that IP can help you:
- Protect your privacy by hiding your real location.
- Bypass geo‑restrictions to access content that’s blocked in your region.
- Improve security by preventing certain types of tracking.
Legal considerations
In most countries, using a VPN or proxy to change your IP is legal, but the same technology can be used for illicit activities. If you’re in a country where VPN usage is restricted, check local laws before proceeding. Also, remember that a VPN does not make you immune to legal liability for the content you access.
Two Main Methods
1. Using a VPN App – Forest VPN
Downloading Forest VPN
- Open the App Store and search for Forest VPN.
- Tap Get → Install.
- Once installed, open the app.
Granting Permissions and Creating an Account
- iOS will ask for VPN permission—tap Allow.
- Sign up for a free trial or log in with an existing account.
Connecting to a Server
Tap the bright green Connect button. Forest instantly negotiates a tunnel with Apple’s VPN API, so you see a single status‑bar icon appear. No extra settings or manual configuration are required.
Verifying Your New IP
- Open Safari.
- Visit https://www.whatismyip.com/.
- The displayed IP should match the server you chose, usually a city in the U.S. or Europe. If it doesn’t, toggle the connection off and on again.
Troubleshooting Tips
- IP not changing – Make sure your iPhone isn’t on a restricted Wi‑Fi network that blocks VPN protocols. Switch to a different network or enable the Use Cellular Data option.
- VPN disconnects – Check that the app is up to date and that your device’s battery‑saving settings aren’t forcing the VPN to close.
2. Configuring a Manual Proxy (Advanced)
If you prefer not to use a VPN app, you can set up a manual proxy on iOS:
- Open Settings → Wi‑Fi.
- Tap the i icon next to your connected network.
- Scroll to Configure Proxy and select Manual.
- Enter the Server address, Port, and, if required, Username and Password.
- Tap Save.
Once configured, Safari and other apps that use the system proxy will route traffic through the proxy server. Manual proxy settings are less convenient than a one‑tap VPN, but they can be useful for certain network environments.
iOS Integration Matters
Because iOS tightly controls VPN connections, Forest uses Apple’s Network Extension API to establish a secure tunnel without requiring root access. The app stays lightweight, respects battery life, and automatically reconnects when the device wakes from sleep.
Performance and Privacy
Forest's servers are clustered across 30+ countries; the app automatically routes your traffic through the nearest node, reducing latency by up to 40% compared to a distant server. Forest logs no connection metadata, and all traffic is encrypted with AES-256, so no one – neither your ISP nor anyone else – can read your browsing.
Ready to Try?
Download Forest VPN now, connect with one tap, and see how fast your browsing feels lighter. Let’s make privacy a habit, not a chore.